guides
How to Grow Peas Indoors
Grow fresh peas indoors in deep containers with a small trellis. Best varieties, light needs, watering, and harvest timing for sugar snap and snow peas.
 Priya Anand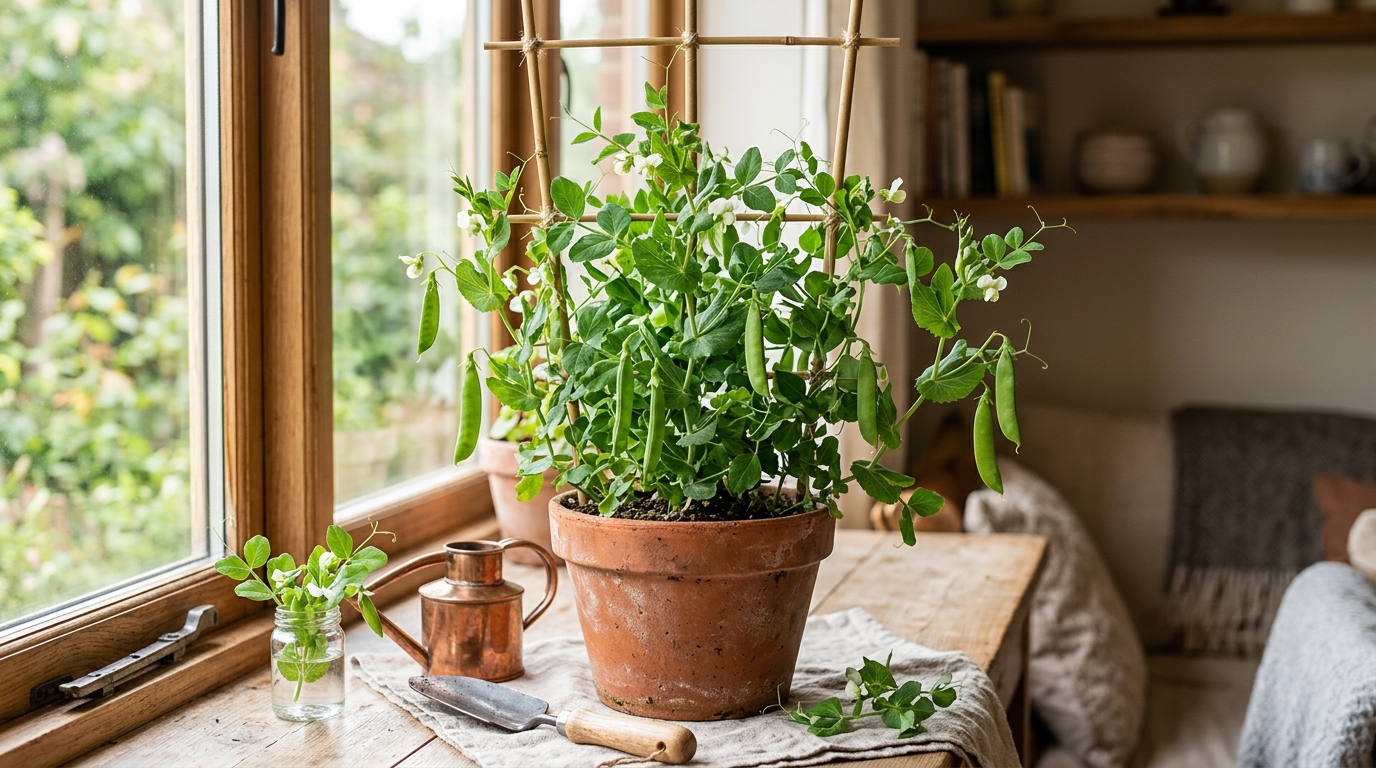
Sugar snap and snow peas are the best choices for growing indoors: sow seeds directly into containers at least 10–12 inches deep, add a small trellis for climbing vines, and provide 6–8 hours of bright light or a grow light running 14–16 hours daily. Peas are cool-season crops that thrive at 55–70°F and produce harvestable pods in 55–70 days from sowing — faster than almost any other edible vine.
Peas are a surprising win for indoor growers. They are cool-season crops that prefer the lower temperatures typical of winter homes (60–68°F), do not demand intense light, and produce heavily once they start flowering. The main constraint is vertical space — peas climb, and even dwarf varieties need at least 18–24 inches of headroom plus a trellis or stakes for their tendrils. Manage the height and you get a continuous supply of fresh snap peas or snow peas through late winter and early spring, when grocery store produce quality is typically lowest.
Is growing peas indoors worth it?
Fresh peas are dramatically better than frozen or grocery store pods. Sugar snap peas begin converting their sugars to starch within hours of harvest — the sweetness of a pod eaten 20 minutes after picking is genuinely different from one that has traveled in refrigerated transit for a week. Indoor growing captures that freshness completely.
The cost-benefit math is simple: a $4–5 packet of dwarf pea seeds contains 50–80 seeds, each of which can produce 20–30 pods under good conditions. A single 12-inch container planted with 8–10 seeds produces roughly 200–300 pods across a 6–8 week harvest window. That is the equivalent of four to six $4 bags of snap peas from the grocery store, from a $5 seed packet and a bag of potting mix.
The real limitation is space and patience. Peas take 55–70 days from sowing to first pod — longer than lettuce or spinach — and the plants occupy a 12–18 inch footprint with 24–36 inches of vertical space for the growing period. But for any grower with a bright window or grow light setup, that trade-off is entirely worthwhile.
What you need to grow peas indoors
| Product | Best for | Rating | Notes | |
|---|---|---|---|---|
| Dwarf sugar snap pea seeds | Indoor containers up to 12 inches deep — compact vines hit 18-24 inches | ★★★★★ | Look for varieties labeled dwarf, bush, or patio. Tom Thumb, Little Marvel, and Misty Shell are excellent indoor performers. Full-size climbing varieties reach 5-6 feet and are not practical indoors. | Check price |
| Deep planter 10-12 inch with drainage | Giving pea roots the 10-14 inches of depth they need | ★★★★★ | A standard 10-12 inch diameter pot that is 12 inches deep fits 4-6 pea plants comfortably. Avoid wide shallow decorative pots — peas will stall and yellow in less than 8 inches of soil depth. | Check price |
| Bamboo trellis or plant stakes | Supporting pea vines and directing tendrils upward | ★★★★★ | A simple 24-30 inch bamboo trellis inserted at sowing time is all most dwarf pea varieties need. Pea tendrils grab anything they can reach — wire, twine, netting, or individual stakes all work. | Check price |
| Premium potting mix with perlite | Providing root aeration and consistent drainage in deep containers | ★★★★★ | Use a quality vegetable potting mix blended with 20% perlite. Garden soil compacts in containers; peas need excellent aeration for nitrogen-fixing bacteria to colonize their roots effectively. | Check price |
| Full-spectrum LED grow light | Growing peas through winter without sufficient south-facing window light | ★★★★★ | Peas need the equivalent of 6+ hours of direct sun. A 45-65W full-spectrum LED panel running 14-16 hours daily provides adequate light for a 2-3 pot setup. Peas are less demanding than fruiting crops. | Check price |
| Low-phosphorus balanced fertilizer | Feeding peas without triggering excess foliage at the expense of pods | ★★★★★ | A balanced 5-10-10 or similar (low nitrogen, higher phosphorus and potassium) applied once at transplanting and once at first flower is sufficient. Peas fix nitrogen; over-feeding with N suppresses pod set. | Check price |
Step 1: Choose the right pea variety
Variety selection is the most consequential decision for indoor pea growing. Standard outdoor pea varieties climb 5–6 feet and produce over a long season in a garden bed — they are completely impractical for containers indoors. You need compact dwarf varieties specifically.
Best dwarf varieties for indoor growing:
- Tom Thumb — an heirloom garden pea that reaches only 8–12 inches and doesn’t need staking. Pods are small but sweet, and plants produce heavily for their size. Ideal for windowsill pots.
- Little Marvel — a classic dwarf garden pea at 15–18 inches, producing plump, sweet pods. One of the most productive compact pea varieties available.
- Sugar Ann (snap pea) — a dwarf sugar snap pea at 18–24 inches with edible pod and pea. Earlier maturing than most snap peas at about 52 days. Excellent container performance.
- Oregon Sugar Pod II (snow pea) — a compact snow pea at 28 inches. Snow peas are harvested before the peas fill out, so pods are flat and entirely edible. Tender and sweet raw.
- Misty Shell — a dwarf shelling pea at 20–24 inches, bred specifically for containers and small-space growing. Produces well in 10-inch pots.
Varieties to avoid indoors: Any variety not labeled dwarf, bush, or patio. Standard garden peas, telephone peas, and most snap pea varieties from general catalogs reach 4–6 feet and require full outdoor trellis systems. They will outgrow any indoor setup within weeks.
Step 2: Choose the right container
Container depth is the most frequently overlooked factor when growing peas indoors. Pea roots extend 10–14 inches downward and need room to develop the nitrogen-fixing nodules on their root system that make peas uniquely self-sufficient among vegetables.
Container depth: A minimum of 10 inches of soil depth is required for good production; 12 inches is better. This rules out most standard decorative planters and window boxes. Look for vegetable growing containers specifically — they are designed for root depth.
Container width: At least 10 inches in diameter to support 4–6 plants with adequate space for root spread. A 12×12 inch square container grows 6–8 dwarf pea plants and yields the best pods-per-footprint ratio.
Material: Plastic containers retain moisture longer than terracotta, which is an advantage for peas — they prefer consistent moisture and do not benefit from the drying cycle that suits herbs like mint and rosemary. Self-watering planters with a reservoir work very well for peas, reducing the risk of the soil drying out during flowering, which causes pods to abort.
Drainage: Essential. Use a container with at least two drainage holes and elevate it slightly so holes do not become blocked. Waterlogged soil prevents nitrogen fixation and causes root rot.
Best for indoor pea growing where consistent soil moisture is critical during pod fill
Self-Watering Vegetable Planter 12-Inch Deep
Peas abort pods during dry spells with a speed that catches growers off guard — one day of dry soil during flowering can drop an entire flush of pods. A self-watering planter with a bottom reservoir eliminates that vulnerability by wicking moisture upward continuously from the reservoir. The 12-inch depth matches pea root requirements and the reservoir means watering once every 5-7 days rather than daily monitoring. One of the few cases where self-watering is not just convenient but actually improves yield.
★★★★★ 4.6 · 6,300 reviews
Check current price on Amazon→Step 3: Sow seeds correctly
Peas are direct-sown — they do not transplant well because their root system is disturbed too easily. Sow seeds directly into their final container at planting time.
Seed preparation: Soak seeds in room-temperature water for 4–6 hours before sowing to soften the seed coat and speed germination. Drain and sow immediately after soaking; do not let soaked seeds dry out.
Sowing depth and spacing: Sow seeds 1 inch deep and 2–3 inches apart. In a 12-inch round container, you can plant 6–8 seeds in a circular pattern, leaving 2 inches from the container edge. Each seed produces one vine; dwarf varieties spaced 2–3 inches apart fill the container well without competition.
Germination: Pea seeds germinate fastest at 50–65°F soil temperature — cool conditions actually favor them. At 60°F, germination takes 7–10 days. At 70°F, seeds may take 10–15 days but still germinate reliably. Above 75°F, germination rate drops and seeds may rot rather than sprout.
Post-germination: Once seedlings emerge, maintain consistent moisture and protect from direct hot afternoon sun for the first two weeks while root systems establish. Thin to the strongest seedlings if seeds were planted more densely.
Step 4: Install a trellis at sowing time
Pea tendrils begin reaching for support within 2–3 weeks of germination. Install your trellis or stakes at sowing time — before seeds sprout — to avoid disturbing roots later.
Simple trellis options:
- Bamboo stakes and twine: 3–4 bamboo stakes inserted at the container perimeter with horizontal rows of twine every 4–6 inches provide a classic pea trellis. Tendrils wrap themselves around the twine.
- Single trellis panel: A rigid mesh or wire trellis panel pushed into the container center provides a climbing surface and can double as a support for the heavy-producing vines.
- Dowels and string: Kitchen twine tied between wooden dowels works perfectly well for Tom Thumb varieties that only reach 12 inches.
- Plant cage: A wire tomato cage works as an improvised pea trellis in a deep round container; the circular form is actually ideal for allowing vines to spread evenly.
Height guide by variety: Tom Thumb needs only 12–15 inches of trellis height. Sugar Ann and Little Marvel need 24–30 inches. Oregon Sugar Pod II needs 30–36 inches.
Best for providing pea vines the climbing surface they need without taking up excessive window space
Bamboo Pea Trellis and Plant Support Netting
Pea tendrils will grab almost any vertical surface — mesh netting works especially well because tendrils find a grip point easily at every inch. A compact trellis net stretched between two bamboo stakes inserted into the container is the simplest indoor setup. The netting stays lightweight, does not block window light significantly, and is reusable across multiple growing seasons. Position the trellis at planting, so you do not disturb root nodules retrofitting support around established vines.
★★★★★ 4.5 · 4,100 reviews
Check current price on Amazon→Step 5: Provide the right light
Peas are cool-season vegetables that evolved in high-latitude environments with long, bright spring days. They need substantial light to flower and produce pods, though their requirements are less demanding than tomatoes or peppers.
Window placement: A south- or east-facing window providing 6–8 hours of direct sun is ideal. South-facing windows provide the most total light and are strongly preferred for winter growing. East windows provide good morning light but may fall short in the 4-hour range during December and January — adequate for foliage growth but may extend the time to first flower.
Under a grow light: A 45–65W full-spectrum LED panel running 14–16 hours daily provides sufficient photosynthetically active radiation (PAR) for pea production. Position the light 8–12 inches above the top of the trellis, adjusting upward as vines grow. Unlike herbs, which need the light source close, peas benefit from slightly more distance to spread even coverage across the climbing vines.
Light for germination: Pea seeds germinate without light. Place sown containers in any warm spot until seedlings emerge, then move them immediately to full light. Etiolated (light-starved) pea seedlings become leggy and weak within days of emergence.
Step 6: Water and fertilize correctly
Watering: Keep soil consistently moist from sowing through pod fill. Peas are not drought-tolerant — a significant dry period at any stage from germination through harvest causes pod abortion and plant stress. Check soil moisture daily by pressing a finger 1 inch below the surface; water when the surface is still faintly moist, before the soil dries out at depth.
In a 12-inch plastic pot, this typically means watering every 2–3 days in winter and every 1–2 days in summer. A self-watering planter largely automates this — refill the reservoir every 5–7 days and the wicking mechanism maintains consistent moisture.
Fertilizing: Peas fix atmospheric nitrogen through symbiotic bacteria in root nodules, making them largely self-sufficient for nitrogen. Over-fertilizing with high-nitrogen feeds produces lush, dark green foliage but inhibits flowering and pod set. Use a low-nitrogen, balanced fertilizer (5-10-10 or similar) once at planting and once again at first flower. Alternatively, add a slow-release balanced granular fertilizer at potting time and do not feed again during the growing season.
What to skip: Avoid soluble nitrogen-heavy fertilizers like fish emulsion at full strength during the flowering and podding phase. A healthy pea plant in good soil and at correct light needs almost no nitrogen supplementation.
Step 7: Harvest regularly to maximize production
Peas produce on a signal: once mature pods remain on the vine, the plant reads it as reproductive success and slows further pod production. Harvesting frequently keeps the plant producing continuously.
Sugar snap peas: Harvest when pods are plump and round, before the peas inside create visible bumps that push against the pod walls. The sweet spot is firm, fully filled pods that still feel tender when pressed. At this stage the pod and peas inside are both edible raw or cooked.
Snow peas: Harvest when pods are flat, fully developed in length, and before any pea swelling is visible. Snow peas become tough and stringy if left too long. Check daily during peak production — pods that are at the right stage today may be past peak within 24 hours in warm conditions.
Garden peas: Shell peas are best harvested when pods are bright green and peas feel full when pressed through the pod wall. Taste-test a pod to confirm sweetness — at peak sweetness, garden peas eaten raw are remarkably different from any store-bought product.
Harvest frequency: Every 2–3 days during peak production, which typically lasts 4–6 weeks after first pod. After 6–8 weeks, production naturally tapers as the plant ages. At that point, compost the spent vines and resow for another crop — peas are fast enough to run two indoor crops in a cool-season growing period.
Troubleshooting common indoor pea problems
Vines growing but no flowers after 60+ days — most commonly caused by insufficient light. Peas need 6+ hours of bright light to initiate flowering. Move to a sunnier window or lower a grow light. Excessive nitrogen fertilizing also delays flowering; avoid high-N feeds after the first month.
Pods forming but dropping before maturing — caused by soil drying out during pod fill or temperatures above 75–80°F. Check watering consistency. Move containers away from heat sources (radiators, south windows in summer). If indoor temperatures reliably exceed 75°F, peas may not produce until temperatures cool.
Yellowing lower leaves — normal as the plant redirects energy to pods; also common when root nodules are not effectively colonizing (rare in good soil). If yellowing progresses rapidly upward, check drainage and ensure the plant is not sitting in standing water.
Powdery white coating on leaves — powdery mildew, which affects peas in conditions of poor air circulation and humidity fluctuations. Increase airflow with a small fan near the container. Remove severely affected leaves. Peas near the end of their production cycle often develop mild mildew naturally — at that stage, it is a sign to harvest the remaining pods and compost the plant.
Leggy seedlings stretching toward the window — insufficient light at germination. Move immediately to maximum available light. Leggy seedlings can be planted slightly deeper once they reach 4–5 inches to compensate, but the earlier the light exposure is corrected the better.
FAQ
Frequently asked questions
Can you grow peas indoors without a grow light?
How long do indoor peas take to produce pods?
How deep does a container need to be for indoor peas?
Do indoor peas need pollination?
What temperature is best for growing peas indoors?
Can you grow peas hydroponically indoors?
How many pea plants fit in a 12-inch container?
Bottom line
Growing peas indoors is more rewarding than most growers expect. The flavor of a freshly picked sugar snap pea — sweet, crisp, and intensely pea-flavored — is genuinely unlike anything available at a grocery store. The keys to success are container depth (12 inches minimum), a trellis installed at sowing, cool indoor temperatures that most homes already provide in winter, and consistent moisture during the 55–70 day growing window.
Start with a dwarf variety like Sugar Ann or Tom Thumb, sow directly into a 12-inch deep container in October through February, and provide a south-facing window or grow light. The first pods arrive in less than two months from sowing, and daily harvesting keeps production going for 4–6 weeks after that.
The one failure mode to avoid: harvesting too infrequently. Check your vines every two to three days and pick pods the moment they reach their prime. Leave mature pods on the vine for even a few days and the plant interprets it as a completed reproductive cycle and slows down. Harvest aggressively and the plant keeps giving.
For more cool-season indoor vegetable growing: how to grow spinach indoors for another fast, cool-weather crop that pairs well with peas in a window garden, how to grow lettuce indoors for the easiest indoor vegetable, how to start seeds indoors for complete seed-starting guidance that applies to peas and beyond, and best grow lights if your window light falls short of the 6-hour minimum peas need to flower.