guides
Grow Tent Ventilation Guide: Fans, Filters & Airflow
Learn how to ventilate a grow tent properly. Covers fan sizing, carbon filters, intake setup, and airflow tips for heat and humidity control.
 Priya Anand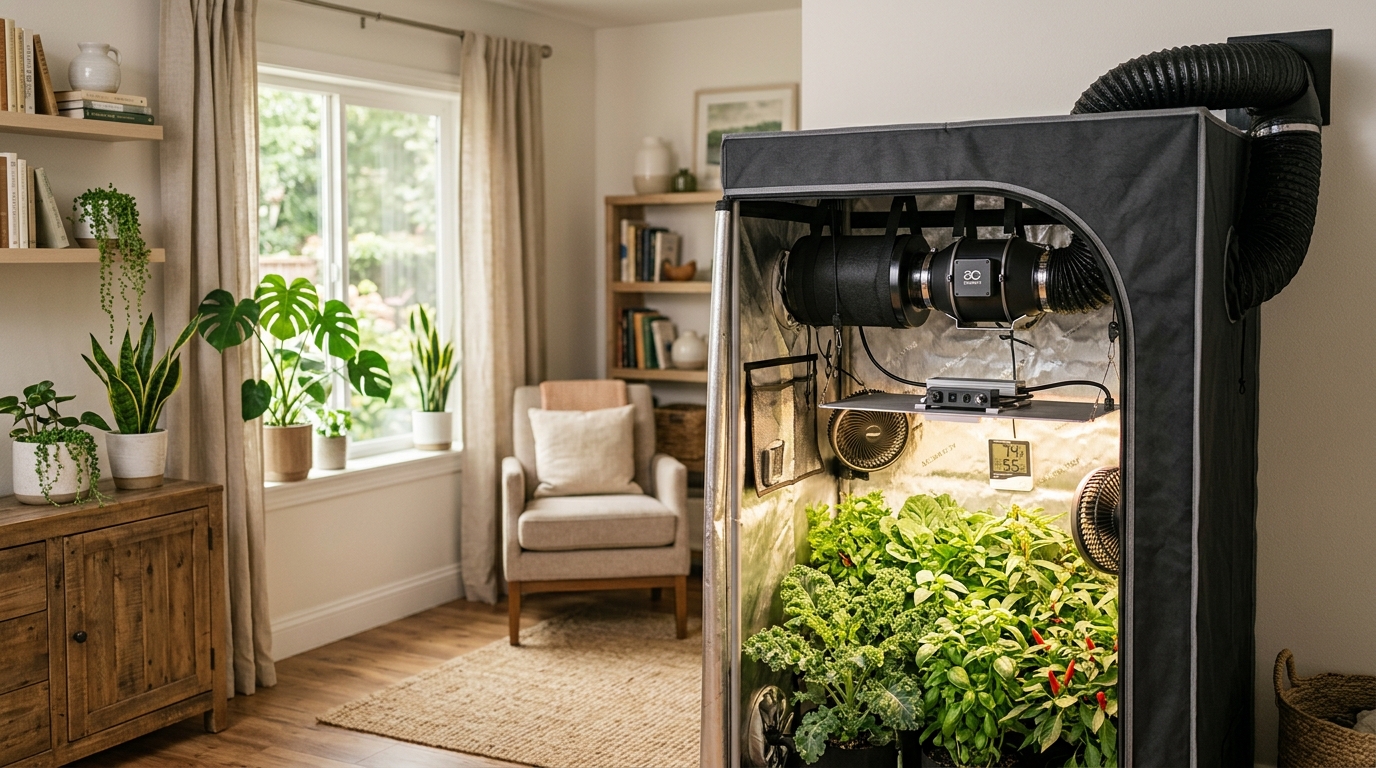
For most grow tents, one inline exhaust fan sized to exchange the tent air volume every 1–3 minutes — combined with an activated carbon filter — is the complete ventilation setup. A 4-inch inline fan covers tents up to 3×3 feet; a 6-inch fan handles 4×4 tents and larger. Add one oscillating clip fan inside for air circulation and your environment is dialed in.
Why does ventilation matter in a grow tent?
A grow tent without ventilation becomes a closed system. Carbon dioxide gets depleted as plants photosynthesize, heat builds from grow lights, and humidity rises from plant transpiration and wet soil. Within hours of sealing a tent, CO2 can drop below the 400 ppm ambient baseline, temperatures can spike 20°F above the surrounding room, and relative humidity can exceed 80% — conditions that invite powdery mildew and fungal disease while actively slowing growth.
Proper ventilation solves all three problems simultaneously: fresh outside air replenishes CO2, the exhaust removes heat from the space, and continuous air exchange carries moisture out before humidity climbs into the danger zone.
The secondary benefit is stem strengthening. Gentle airflow from an oscillating fan causes stems to flex slightly, triggering a growth response called thigmomorphogenesis — plants build thicker cell walls in response to mechanical stress. Herbs and vegetables grown with consistent airflow produce noticeably sturdier stems compared to the same plants grown in still air.
How to size your exhaust fan for any grow tent
The standard sizing formula is straightforward: divide the tent volume in cubic feet by 3. The result is the minimum CFM (cubic feet per minute) rating your exhaust fan needs to exchange air every three minutes.
Volume calculation: multiply length × width × height, all measured in feet. A 4×4×7 tent has 112 cubic feet. Divide by 3 to get a minimum of 37 CFM. In practice, always round up to the next fan size and account for carbon filter resistance: most inline fans lose 15–25% of their rated CFM when a filter is attached. Sizing up by one tier compensates and leaves useful speed headroom.
| Product | Best for | Rating | Notes | |
|---|---|---|---|---|
| 2x2 tent (28 cu ft) | Seedlings, clones, single plant | ★★★★★ | A 4-inch inline fan rated at 100-190 CFM provides adequate airflow with headroom for carbon filter resistance. Most growers run it at 30-50% speed with a speed controller to avoid over-drying the environment in a small space. | Check price |
| 3x3 tent (63 cu ft) | 2-4 plants in vegetative or flowering stage | ★★★★★ | A 4-inch inline fan at full speed or a 6-inch fan at reduced speed handles this tent size comfortably. The 6-inch option gives more speed range for dialing in humidity without pulling too much air. | Check price |
| 4x4 tent (112 cu ft) | The most common home grow setup | ★★★★★ | A 6-inch inline fan is the standard for 4x4 tents. It delivers adequate CFM with a carbon filter attached and leaves speed headroom for adjusting when grow lights add heat. A 4-inch fan cannot keep up on a 4x4 with a filter attached. | Check price |
| 5x5 or 4x8 tent (175-224 cu ft) | Larger home grows and serious hobbyists | ★★★★★ | An 8-inch inline fan is the right size for these volumes. Two 6-inch fans pulling from separate zones is an alternative that gives redundancy and independent speed control across the canopy. | Check price |
| 8x8 or larger (448+ cu ft) | Dedicated grow rooms and commercial home setups | ★★★★★ | Step up to a 10-inch or 12-inch inline fan, or run two 8-inch units. At this scale active intake fans become worthwhile to balance the negative pressure from pulling so much air through passive vents alone. | Check price |
Carbon filters: do you need one and how to connect it
A carbon filter (also called a carbon scrubber) uses activated carbon to adsorb odor compounds from exhaust air before it leaves the tent. For crops with strong aromas, it is not optional — it is the difference between a pleasant grow room and a house that smells like a farm.
Even if odor is not a concern, a carbon filter scrubs particulates before they reach your inline fan blades, and the pre-filter sleeve doubles as an air quality indicator that tells you when airflow is restricted by dust buildup.
How to connect a carbon filter — step by step:
- Hang the carbon filter at the top of the tent using the included straps or carabiners hooked to the top cross bars. Heat and odors rise, so positioning the filter high captures both at the source.
- Attach one end of 4-inch or 6-inch ducting (match your fan size) to the carbon filter outlet collar.
- Connect the other end of the ducting to the inline fan intake port.
- Run a second piece of ducting from the fan exhaust out through the tent top exhaust port.
- Secure every connection with duct clamps and seal gaps with metal foil tape to prevent unfiltered air from bypassing the carbon media.
Carbon filter pre-filter sleeves need replacement every 4–6 months in humid environments. The activated carbon core itself typically lasts 1–2 years. When the filter starts passing noticeable odors, the carbon is spent and the core needs replacement.
Best for 2x2 and 3x3 grow tents
AC Infinity CLOUDLINE T4, Quiet 4-Inch Inline Fan
The AC Infinity CLOUDLINE T4 is the top-rated 4-inch inline fan for home growers. A mixed-flow impeller design delivers 205 CFM at near-silent operation. The built-in controller supports programmable temperature and humidity triggers — set it to ramp speed when the tent hits 80 degrees F and idle back at night automatically without any manual adjustment.
★★★★★ 4.7 · 21,400 reviews
Check current price on Amazon→Best for 4x4 grow tents and setups with carbon filters
AC Infinity CLOUDLINE T6, Quiet 6-Inch Inline Fan
The T6 delivers 402 CFM with EC motor efficiency, a programmable thermostat and hygrostat controller, and direct compatibility with AC Infinity carbon filters. Run at 40-60% speed in a 4x4 tent to avoid over-drying the environment while maintaining plenty of heat and humidity headroom. The most popular 6-inch fan among home growers for good reason.
★★★★★ 4.8 · 34,700 reviews
Check current price on Amazon→Active vs passive intake: which is better?
Passive intake means leaving lower vent ports partially open — typically 20–40% unzipped — so fresh air is drawn in naturally as the exhaust fan creates a slight negative pressure inside the tent. The tent walls bowing inward is the confirmation that passive intake is working correctly.
Active intake uses a second inline fan at the lower intake port, pushing fresh air in while the exhaust fan pulls it out. Active intake is more complex to set up and requires careful airflow balancing between the two fans to avoid positive pressure, which causes unfiltered air to escape through tent seams.
For most home growers with tents up to 5×5 feet, passive intake is the correct choice. It is simpler, less expensive, and performs effectively because grow tents are relatively small volumes. The negative pressure from the exhaust fan alone draws adequate fresh air through partially open lower ports.
Active intake becomes worthwhile in two specific situations: very large tents where passive ports cannot supply enough air to balance a high-CFM exhaust, and setups in hot environments where you want to push cooled air from an adjacent air-conditioned room directly into the intake instead of drawing warm room air passively.
Oscillating fans for internal air circulation
The exhaust fan handles air exchange — moving old air out and fresh air in. Circulation fans handle a separate job: moving air within the tent to eliminate hot spots, cold pockets, and stagnant humid air that builds around dense canopy foliage.
Without internal circulation, the air immediately above the canopy stays warm and humid regardless of how aggressively the exhaust operates. Leaves suffer from humidity buildup inside tight foliage even when the overall tent relative humidity is acceptable. Oscillating airflow solves this by continuously refreshing the air layer that surrounds each leaf surface.
Sizing rule: one 6-inch clip fan per 4×4 square feet of canopy. Position fans at canopy level pointing horizontally across the tops of plants — not directly downward at close range, which causes wind burn on sensitive leaf tips. Fans that oscillate distribute airflow more evenly than fixed-position units. Run the circulation fan 24 hours a day; the benefit is the same during both lights-on and lights-off periods.
Best for Internal air circulation in grow tents up to 4x4
Hurricane 6-Inch Clip Fan, Oscillating
Clips securely to any tent pole or cross bar. Two speed settings and a 360-degree pivoting head let you direct airflow exactly where it is needed. At 6 inches with 165 CFM, it moves enough air to keep canopy humidity in check without wind-burn risk. Run it continuously — the stem-strengthening benefit of gentle airflow adds up over a full grow cycle.
★★★★★ 4.5 · 8,200 reviews
Check current price on Amazon→Managing temperature and humidity through ventilation
Temperature targets at canopy level
- Seedlings and clones: 70–77°F — slight warmth promotes root development
- Vegetative growth: 68–82°F
- Flowering and fruiting: 65–80°F — slightly cooler temperatures improve flavor and color in aromatic varieties
- Lights-off: 60–70°F — a 10°F drop from lights-on to lights-off is normal and healthy
When temperatures exceed 85°F, photosynthesis slows, terpene production drops in aromatic plants, and beneficial soil microbes begin dying off. If your tent consistently runs hot with the exhaust fan at full speed, the cause is almost always grow light heat output. Consider raising the light higher in the tent, switching to a more efficient LED fixture, or placing a small air conditioning unit in the room adjacent to the passive intake port.
Humidity targets by growth stage
- Clones and seedlings: 70–80% RH — high humidity reduces transplant stress and supports leaf uptake before roots are established
- Vegetative growth: 50–70% RH
- Flowering: 40–50% RH — lower humidity prevents mold and bud rot in dense flowering canopies
- Late flowering: 40–45% RH — the critical window where powdery mildew risk is highest
If tent humidity runs consistently above 60% during flowering despite adequate exhaust, the usual culprit is watering timing. Wet soil evaporates continuously for hours after watering. Water in the morning when lights turn on, so the soil surface dries before lights-off, and run the exhaust fan at full speed during the final hours of the light cycle when transpiration peaks.
Step-by-step grow tent ventilation setup
- Calculate your tent volume. Multiply length × width × height in feet.
- Choose your exhaust fan. Divide volume by 3 to get minimum CFM. Add 25% to compensate for carbon filter resistance and round up to the next fan size.
- Hang the carbon filter at the top of the tent from the top cross bars. Attach the pre-filter sleeve before installing.
- Connect ducting from the carbon filter outlet collar to the inline fan intake. Secure with duct clamps.
- Route exhaust ducting from the fan outlet through the top port of the tent. Seal gaps around the port with foil tape or a foam grommet insert.
- Open lower intake vents 20–40% for passive airflow. Do not seal all vents shut.
- Mount circulation fans at canopy level on tent poles using clip clamps. Aim across the canopy, not straight down onto it.
- Set the exhaust fan speed to 40–60% as a starting point, then adjust upward if temperature or humidity readings are out of range.
- Verify the setup: tent walls should bow slightly inward, canopy temperature should reach the target range within 30 minutes of lights-on, and the tent should not smell when you enter the room with the filter running.
Common grow tent ventilation mistakes
Running the exhaust fan at maximum speed all the time. Over-ventilating a small tent drops humidity below the target range for the growth stage, especially in dry climates, and can deplete CO2 in tightly sealed rooms faster than fresh air refills it. Start at 50% speed and adjust upward only if readings require it.
Sealing all intake vents to keep the tent light-tight. A fully sealed tent with only an exhaust fan creates extreme negative pressure that stresses tent seams and pulls air through tiny gaps — air that bypasses the carbon filter entirely. Keep bottom intake vents partially open; use a light-trap baffle or black fabric sleeve over the opening if stray light is the concern.
Placing the carbon filter on the tent floor. Carbon filters work best at the top of the tent where heat and odors concentrate. A floor-mounted filter draws from the coolest and least odorous zone in the tent and performs noticeably worse at odor control.
Skipping internal circulation fans. The exhaust fan does not substitute for internal airflow. Without a clip fan running inside the tent, hot spots develop directly above the canopy and humidity pockets form inside dense foliage regardless of how aggressively the exhaust operates.
Not sealing ducting connections. Even small air gaps around duct fittings reduce the draw through the carbon filter and allow unfiltered exhaust air to escape. Use duct clamps on every collar connection and run foil tape over any gap you can see.
FAQ
Frequently asked questions
What size inline fan do I need for a 4x4 grow tent?
Do I need a carbon filter in my grow tent?
How often should the air exchange in my grow tent?
Should I run my exhaust fan 24 hours a day?
How do I know if my grow tent has enough ventilation?
Can I use a regular box fan instead of an inline fan for my tent?
Bottom line
Proper grow tent ventilation comes down to three components: an exhaust inline fan sized to exchange your tent air volume every 1–3 minutes, a carbon filter mounted at the top of the tent to scrub odors and particulates, and one or two oscillating clip fans at canopy level to circulate air inside the space. Passive intake through partially open lower vents completes the loop without adding complexity.
For a 4×4 tent, a 6-inch inline fan with a matched carbon filter and one 6-inch clip fan is the standard setup used by experienced home growers. Set the exhaust fan to 50% speed, verify your thermometer and hygrometer readings are in range, and the environment largely manages itself from there.
For related reading: how to set up a grow tent, grow light schedule guide, how to control humidity for plants, and best grow tents.